Sewing Issey Miyake Pattern 1736
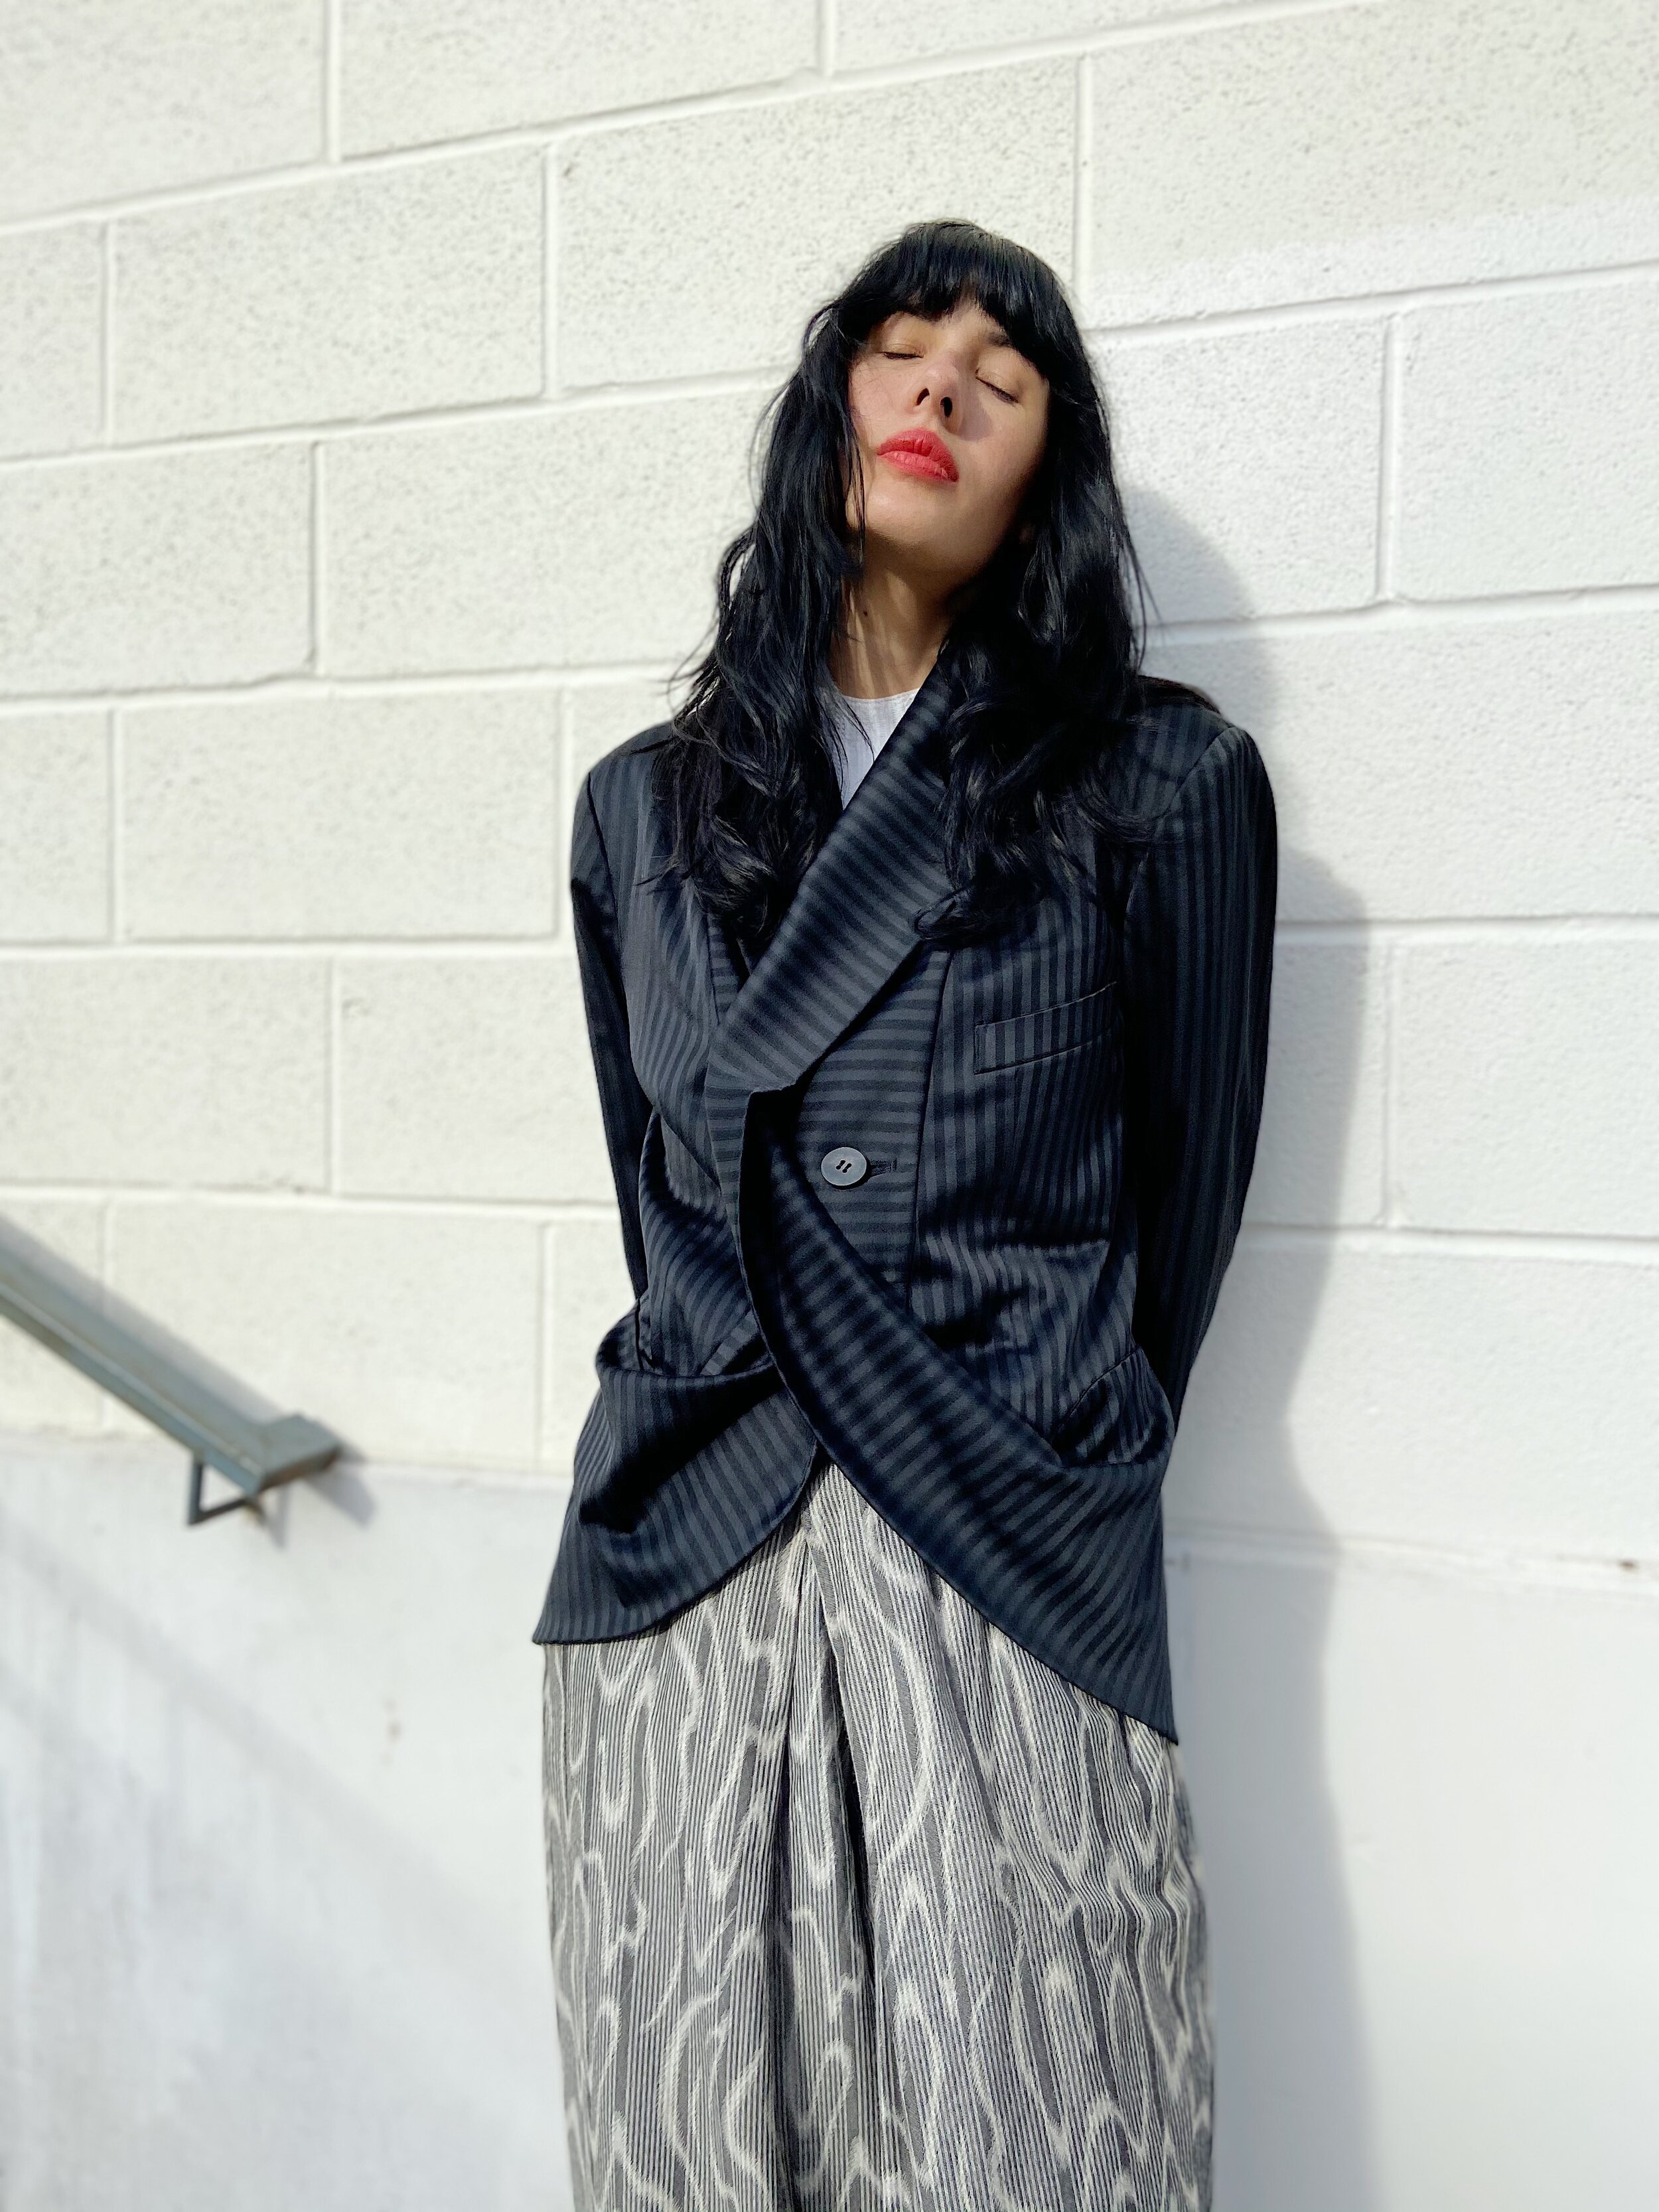
Hello … another blog post!!! I never know what to say when I start writing these. OK, good as any, let’s get started. I sewed Issey Miyake’s Vogue Designer Original pattern 1736 this month. I was very excited to do this one, and I actually found a bunch of photos of the original jacket this was based on from this nice blogger who had this pattern on her wishlist in 2012.. Hope she found it. It was hard to find information or other blogs about this pattern (usually the first thing I do when I start a challenging new pattern) because there’s another Issey Miyake 1736 pattern. Don’t know why. That one is a Vogue Individualist from 1986 and is also a jacket and pants (and a top). Mine is from 1996. OK, here’s the pattern and some photos of the original piece which I found at a vintage boutique called Garment, sold in 2021 for $425. Please note the amazing stripe matching on the welt pocket and on the back panel. Also note the way the shoulder stripes do not match (!) and the possible pucker on the peplum in the back… I really am looking at these photos now that I know how challenging this jacket is to sew and stripe match.


Pattern description: Loose-fitting, lined, below hip jacket has draped front band extending into back collar, shoulder pads, welt pocket, back princess seams/inset, draped back peplum and long, two piece sleeves with mock vent and button trim. Wide-legged pants have front waistband, side front pockets, side front extending to side back, fly zipper and mock hem bands.
As with last time the model on the pattern envelope looks very cool with her little sunglasses and bobbed hair.
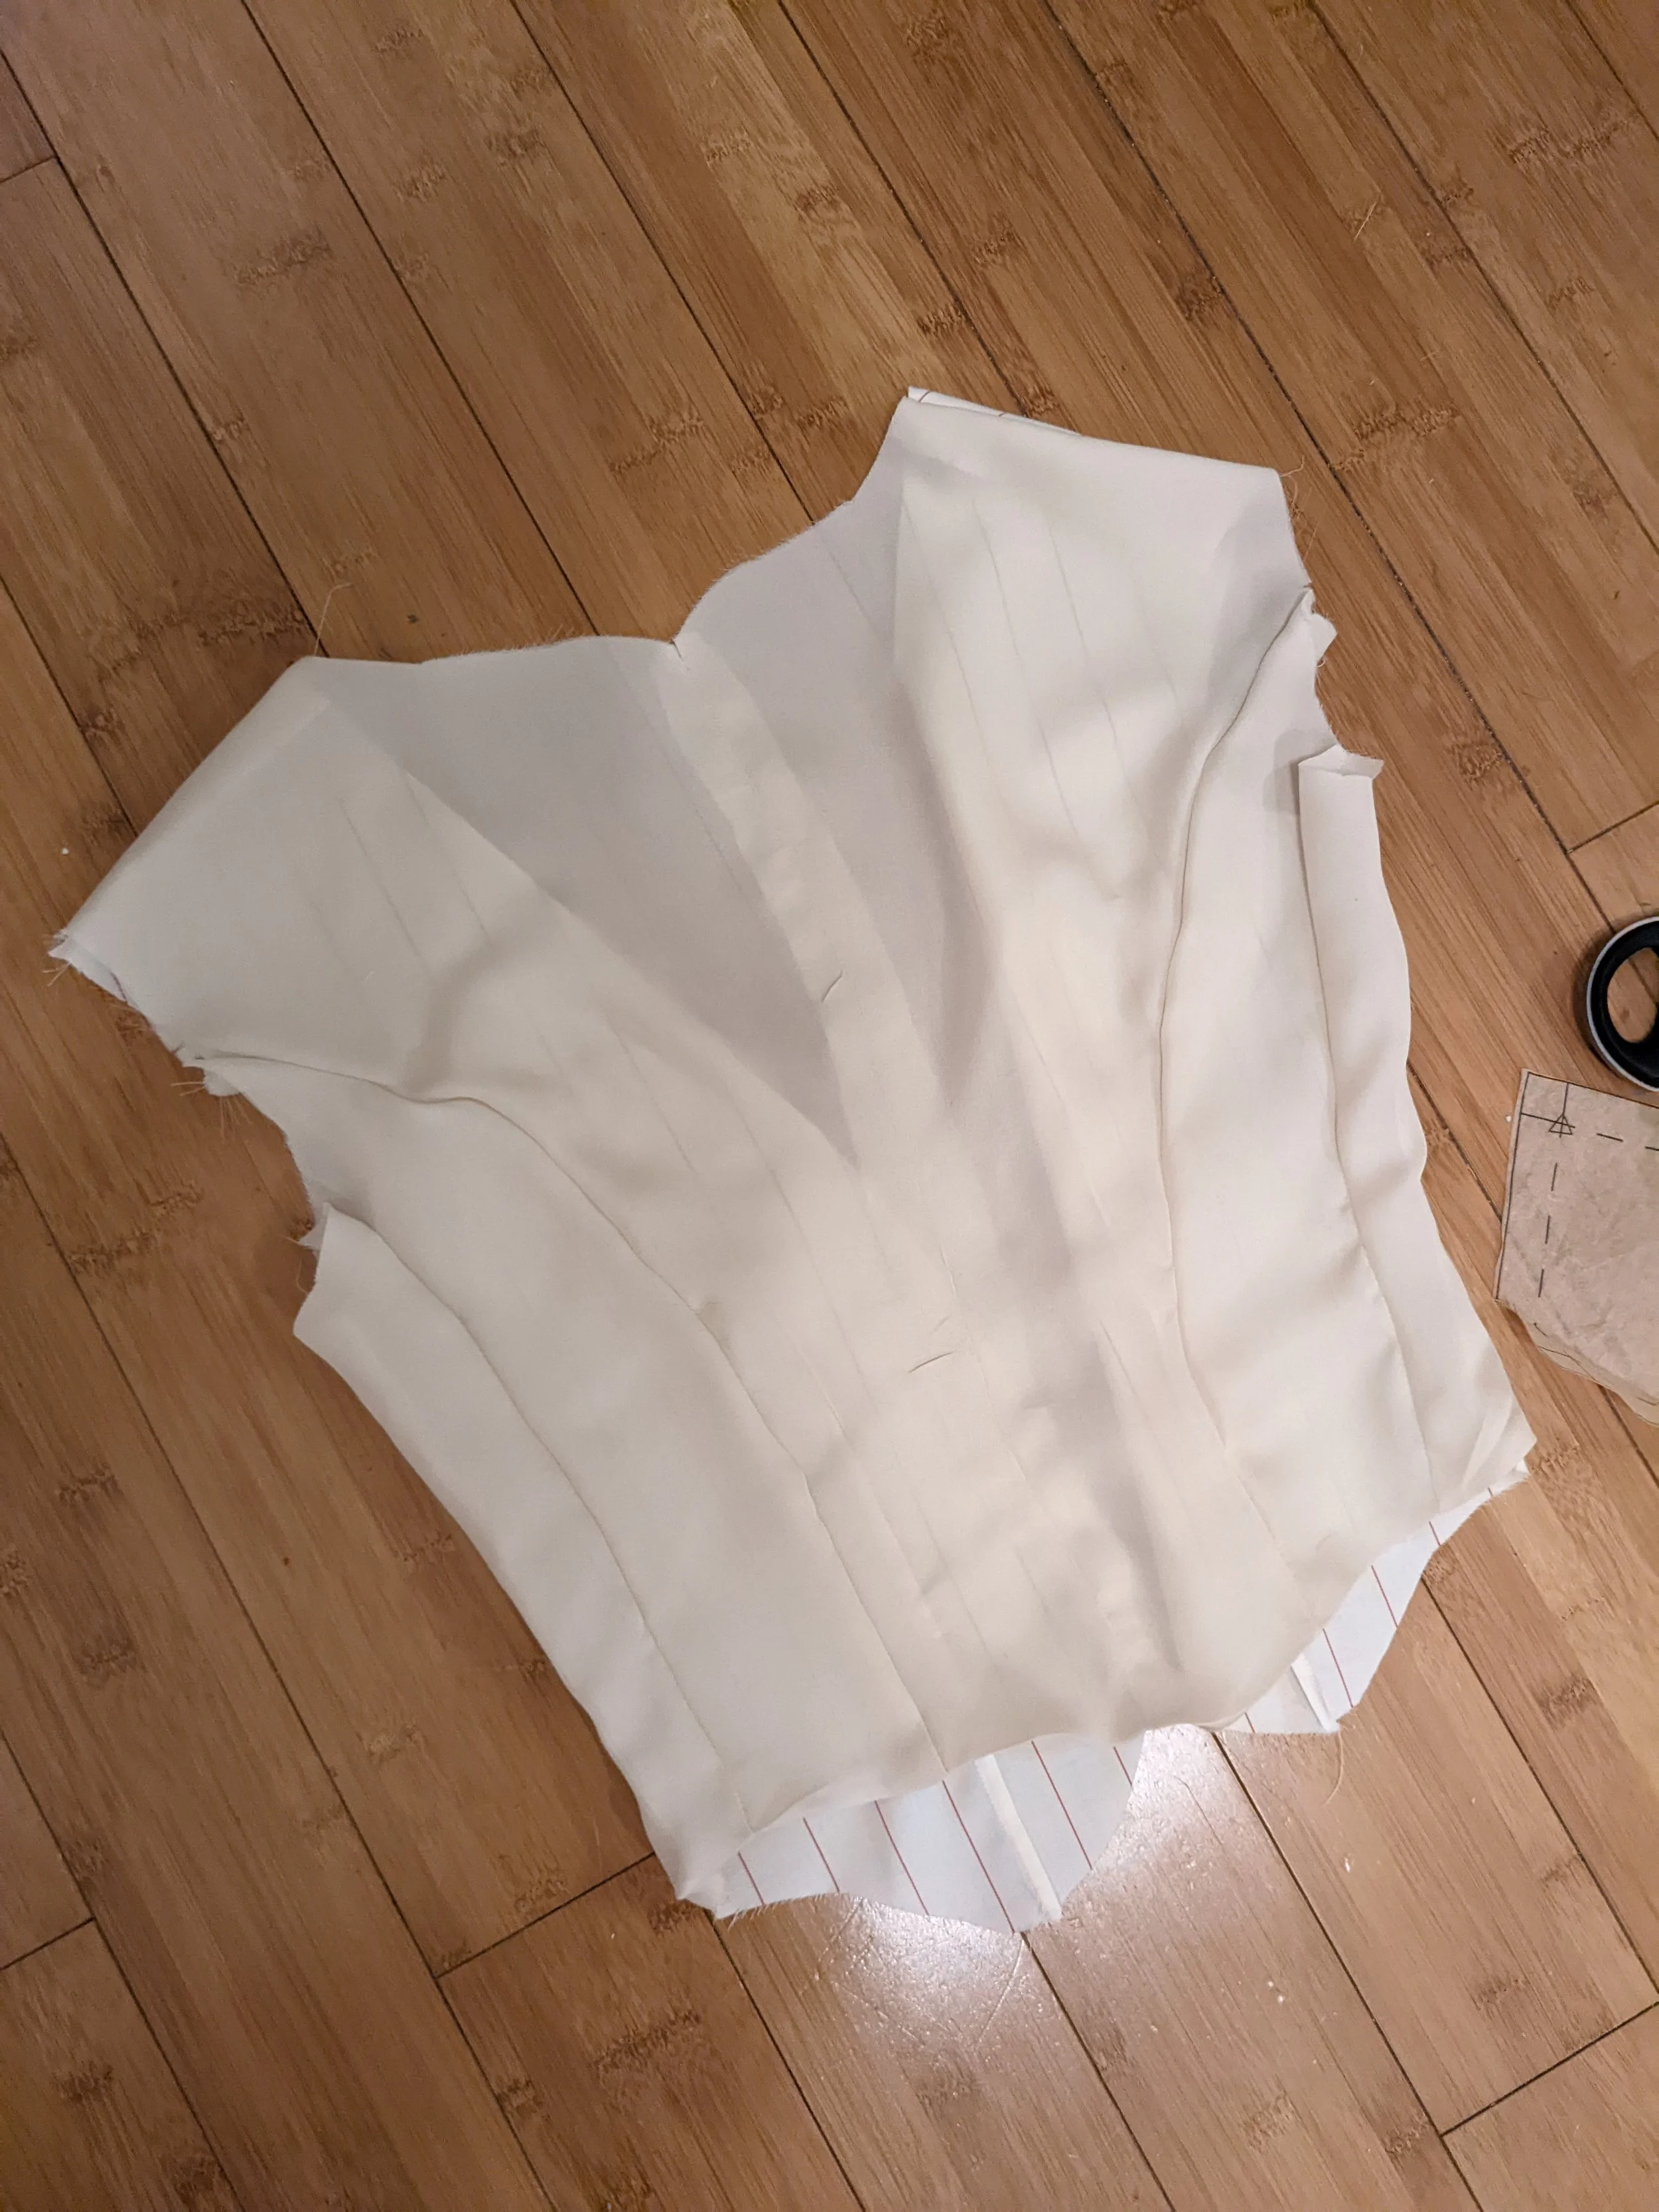
This pattern is basically a double-breasted jacket with a shawl collar and fishtail hem. The shawl collar wraps around into the fishtail/peplum. I was a little concerned about where I could properly match the stripes from my fabric so I made a half muslin without sleeves where I drew the stripes on the grainline with a ruler. Here’s the vest front and back, determined I could match the shoulder stripes and that I could match probably some or most of the seams on the princess-seamed back. The back seams curve so I knew it might be tricky. It is important to cut pieces along the specified grain line on each pattern piece (which aligns with vertical stripes on fabric) in order to make the fabric hang correctly, and then align the pieces before cutting on that grain so that the stripes might match.


Then I did the shawl/peplum half in order to check if it would need any matching and to get a sense of what it would entail to sew. Don’t mind my hand please. This didn’t really need matching in the end, just didn’t know how to sew it so had to practice. I would like to say I messed with the fit at all, length and sizing, but I didn’t, I never do that really and especially not on tailored jackets etc where I’m just trying to sew it correctly much less resize an armscye, not doing that.

The next step after cutting the fabric and interfacing the front pieces (which I did in a mid weight muslin) was to do the front welt pocket. Thank god there was only one. I redid the welt flap since I sewed it awkwardly the first time. You’ll notice the first of the 2 flap pictures shows a much narrower welt with messy corners on left and right, that was wrong, the 3rd photo of the 4 is correct. And of course, I was just so so precise about making sure the stripes aligned. First mistake.. it is coming right up.


If you looked carefully at the original photos, or you are a person who has worn a suit (??) then you know that welt pockets like this have a welt facing up, not down like a flap (which is what I am more used to). So the stripes didn’t match, and once you have slashed a welt open, you cannot redo it. They were like almost perfectly 50% off so I give myself a pass here, kind of.

As I was doing all of this I was thinking, oh it would be so smart if I documented the problems I had or my thoughts while I was doing this and then I turned that into my blog at the end instead of just writing my random thoughts that come up as I look through my photos hastily at the end of my project. Then I didn’t do that, maybe next time. Next I did the back body and finished the vest part, here’s some nice stripe matching photos.


Next I did the sleeves. I followed the Claire Shaeffer method from Couture Tailoring: A Construction Guide for Women’s Jackets, AKA patricia bible. Please see my Sewing a Couture Jacket blog post for more on that… Sleeves are done separately and lined on their own, plus the cuffs are interfaced nicely.


So pretty :) I love you Claire Shaeffer. Here’s me lining the sleeves with her funny (excellent) little method of basting the lining to the inside out sleeve seam and slipping it inside the sleeve.


This blog post is already so long are you bored? I guess not, it was interesting for me to do this. here’s the peplum, that was easily done, it’s basically just a long loop of fabric sewn along the outer edge of the vest.


Next, lining (lining also has front facing pieces out of self fabric). This was easy by now, since I did it already and this didn’t have interfacing (or a welt pocket obviously). It was also very easy to insert, just sew to the body leaving the bottom inside hem open and the peplum/shawl free. I am really confidently calling all of these things “very easy” for a girl who worked on this lined, stripe matching, Japanese avant garde jacket for a month.


Next lined the sleeves, that part I was really dreading and avoiding due to the vent in the sleeve but it turned out pretty. Catch stitching by hand, you already know!

Then… setting in the sleeves. This was a nightmare. This actually was hard. Even though my fabric was a wool suiting, it was thin and didn’t have as much memory as I thought it would, so easing and shrinking the sleeve heads to fit into the armscye (arm hole.) was not as easy as I thought it would be. I did it, it puckered a bunch, I went upstate for a weekend, I came back, I looked at it and felt bad about myself, I ripped out both sleeves, shrank them more, and redid them. I have a sort of superstition that if I redo things too much (something I used to do constantly when I started sewing since I made so many mistakes), the fabric will start giving out. Which is true! I just feel it won’t be as malleable any more. So I gave it a 2nd try and it was “good enough.” Photo of first try, second try. On the 2nd the fabric is rumpled from steaming but it’s set in smoothly.


At this point I was despairing. I hated how the jacket looked on. I did not like the sleeves, I felt bad having redone them. it felt strangely sized and messy somehow. I was mad. I felt like I needed to start doing projects that were better for me as a person wearing the clothes (not a model) and also that I was a fundamentally uncool person. however I had to keep going.
Then I set in the shoulder pads invisibly and stitched in the sleeve lining by hand, this is the Claire Shaeffer method.


Then… I catch-stitched the end of the lining and the jacket was DONE!!!!! it looked much better with shoulder pads in. So I was feeling calm and happy again.
I wanted to make matching pants so that it would be a glamourous set. But in the spirit of making clothes that make sense for me and do not overwhelm me, and my limited remaining fabric, I made the pants from the pattern as shorts. Here’s me doing the fly front. I really impressed myself doing this fly front, it came out completely flawless and I basically just did it from memory. (I learned how to do these in my first FIT couture sewing class.)


The rest of the shorts were straightforward. they have side seam pockets. They have a lapped waistband that is hand sewn in on the back. I will say however that I think this is the first time that I have made pants from a sewing pattern that actually fit the body measurements from the pattern. All the pants I have made have like, 2+ inches of ease from the body measurement per the size. Some of which is wearing ease (like when you need to sit down) but some of it is just.. I don’t know, bad pattern sizing or something. The size 10 that I cut was for a 25” waist and the shorts are a 26” waist. I was just surprised since the jacket is kind of roomy on me but the shorts fit. So I would like to make these as pants since the fit is good and the wide leg of the pants wrap around the back in a pretty way, which you don’t get to see in the shorts. These shorts could have done with a lining since this fabric is a little sheer but I don’t know how to line a fly-front.
wow! done! blah blah long post. Now for the grand reveal haha.


Amazing job to me!!!!!! And… I did not accidentally do anything backwards. Okay. I did one of the fly pieces backwards but it’s hidden. Aw I’m so happy and I loved this project. It was a long fun journey (Sept 27 to Oct 19). It feels so good to sew stuff like this. Like the best thing in the world for me. This project was great because it was challenging and almost nothing went really off the rails, I feel very satisfied with a good job well done.
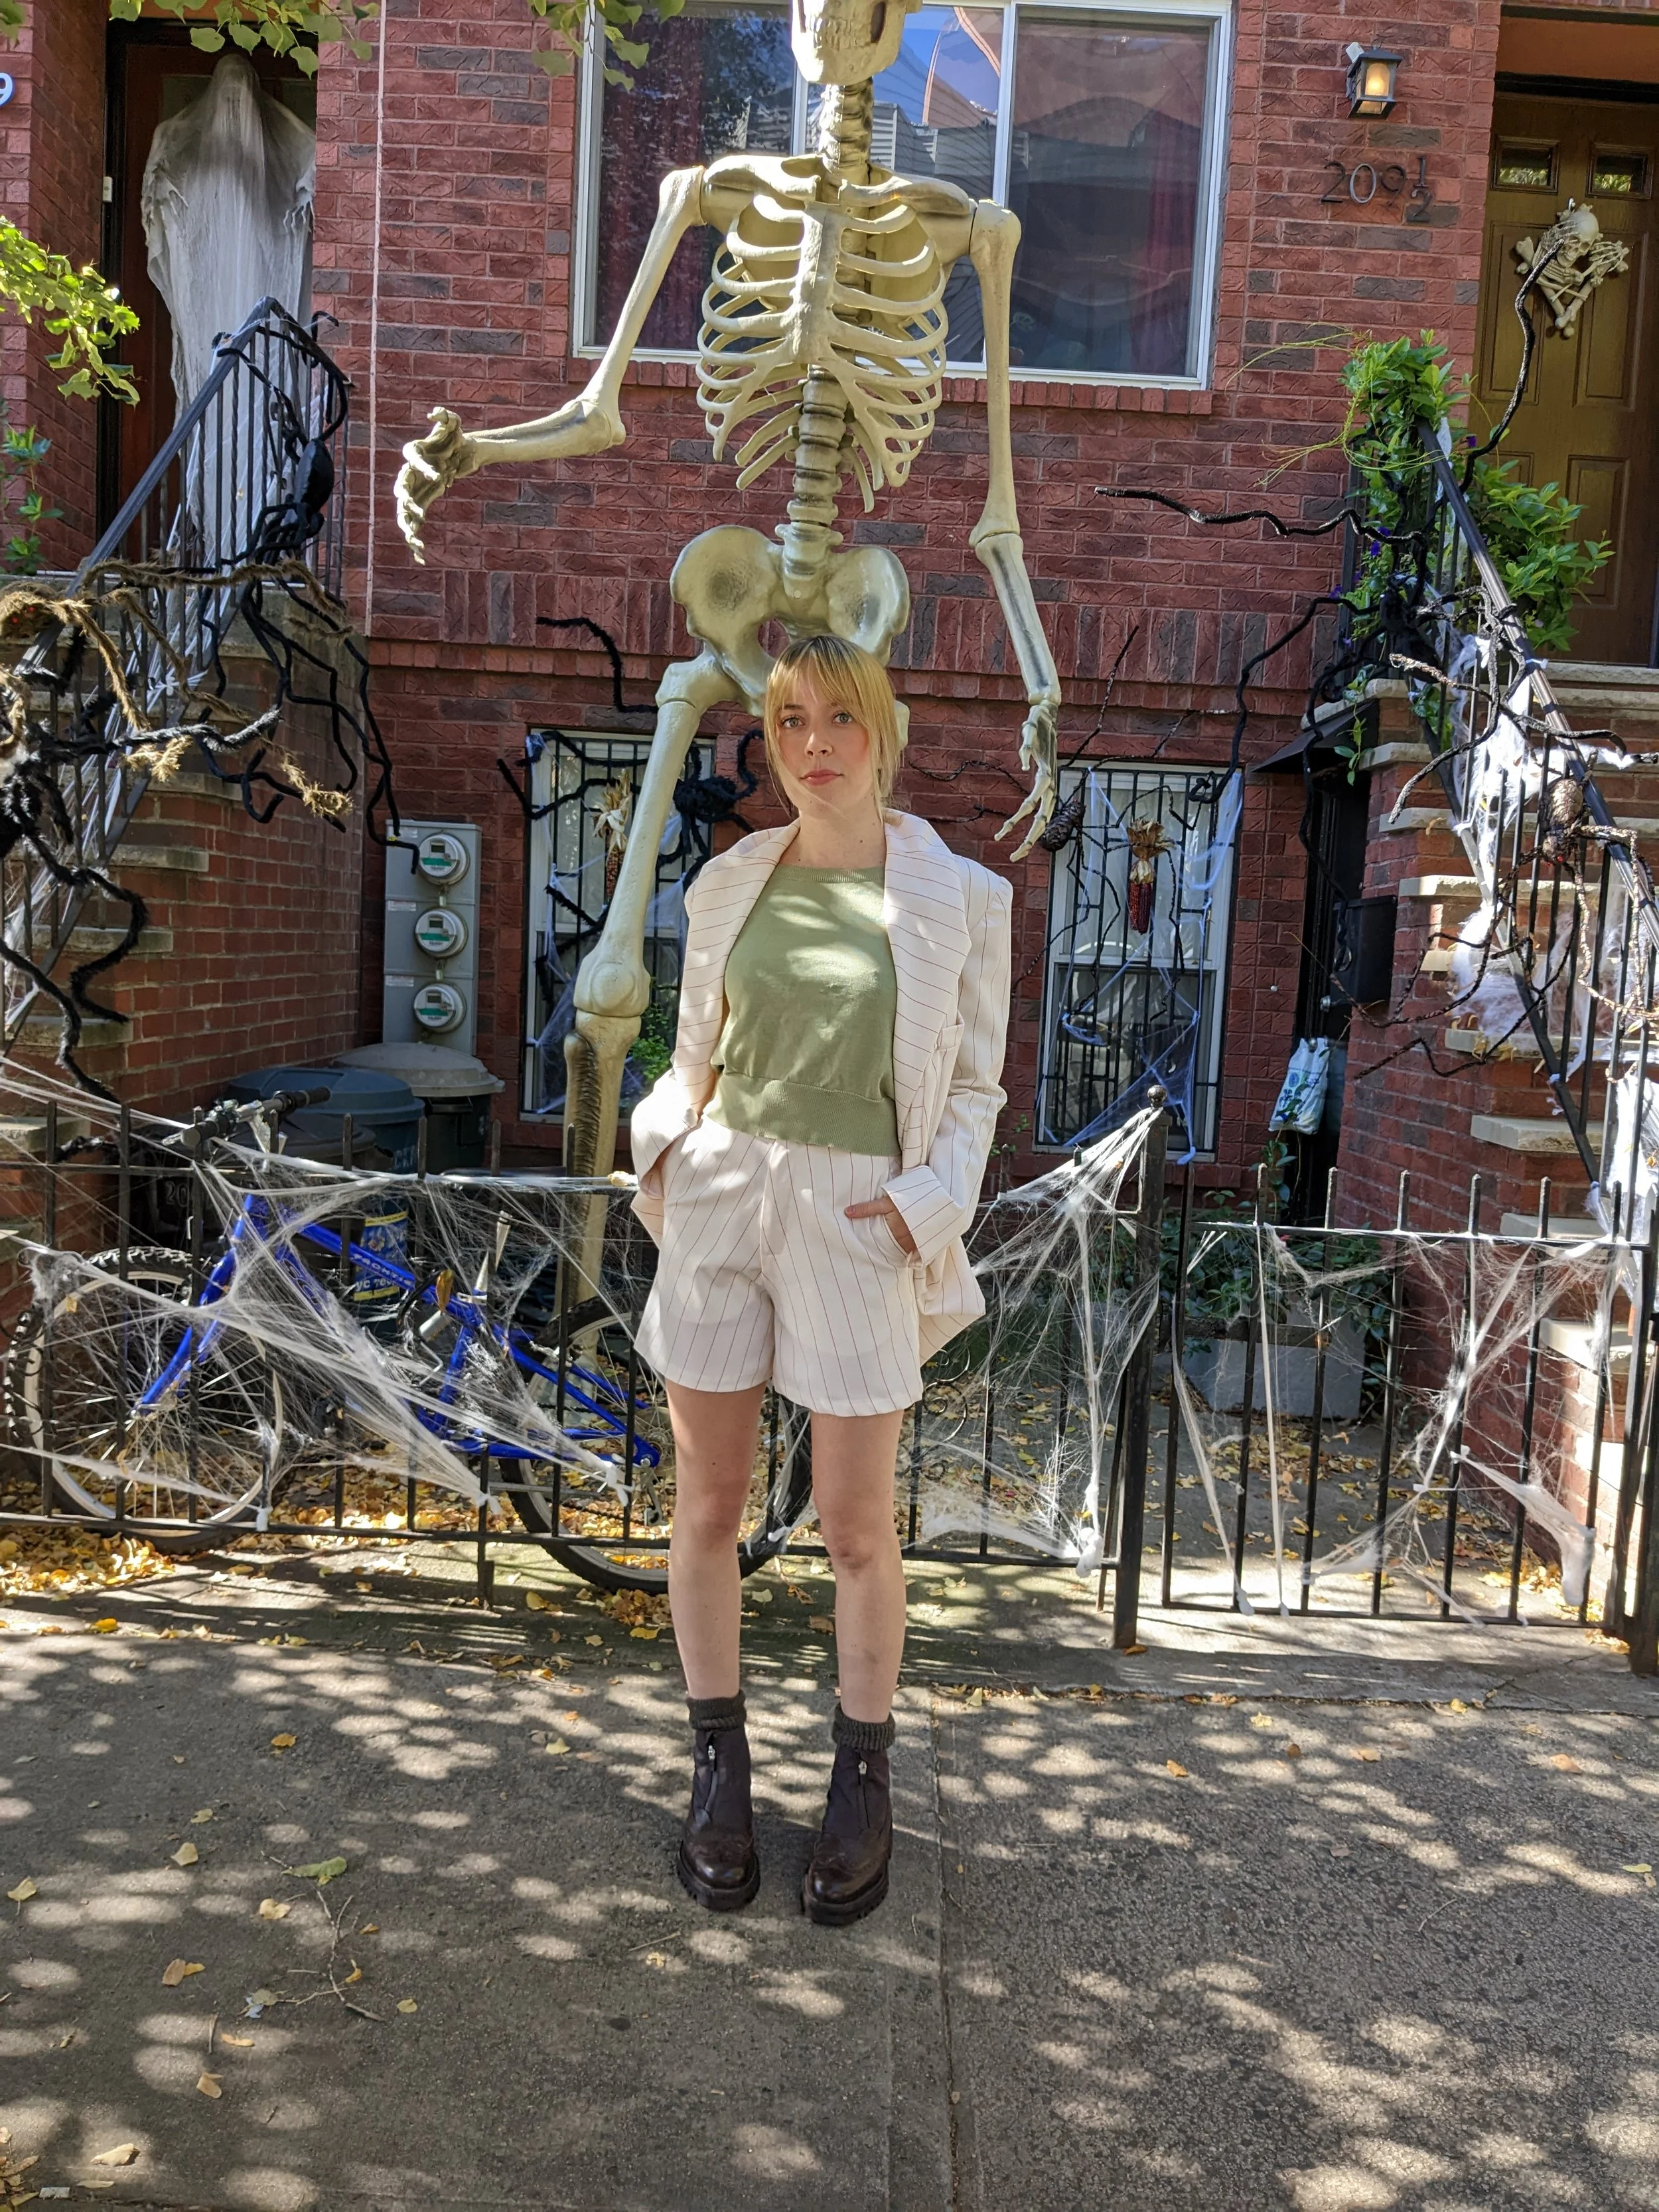

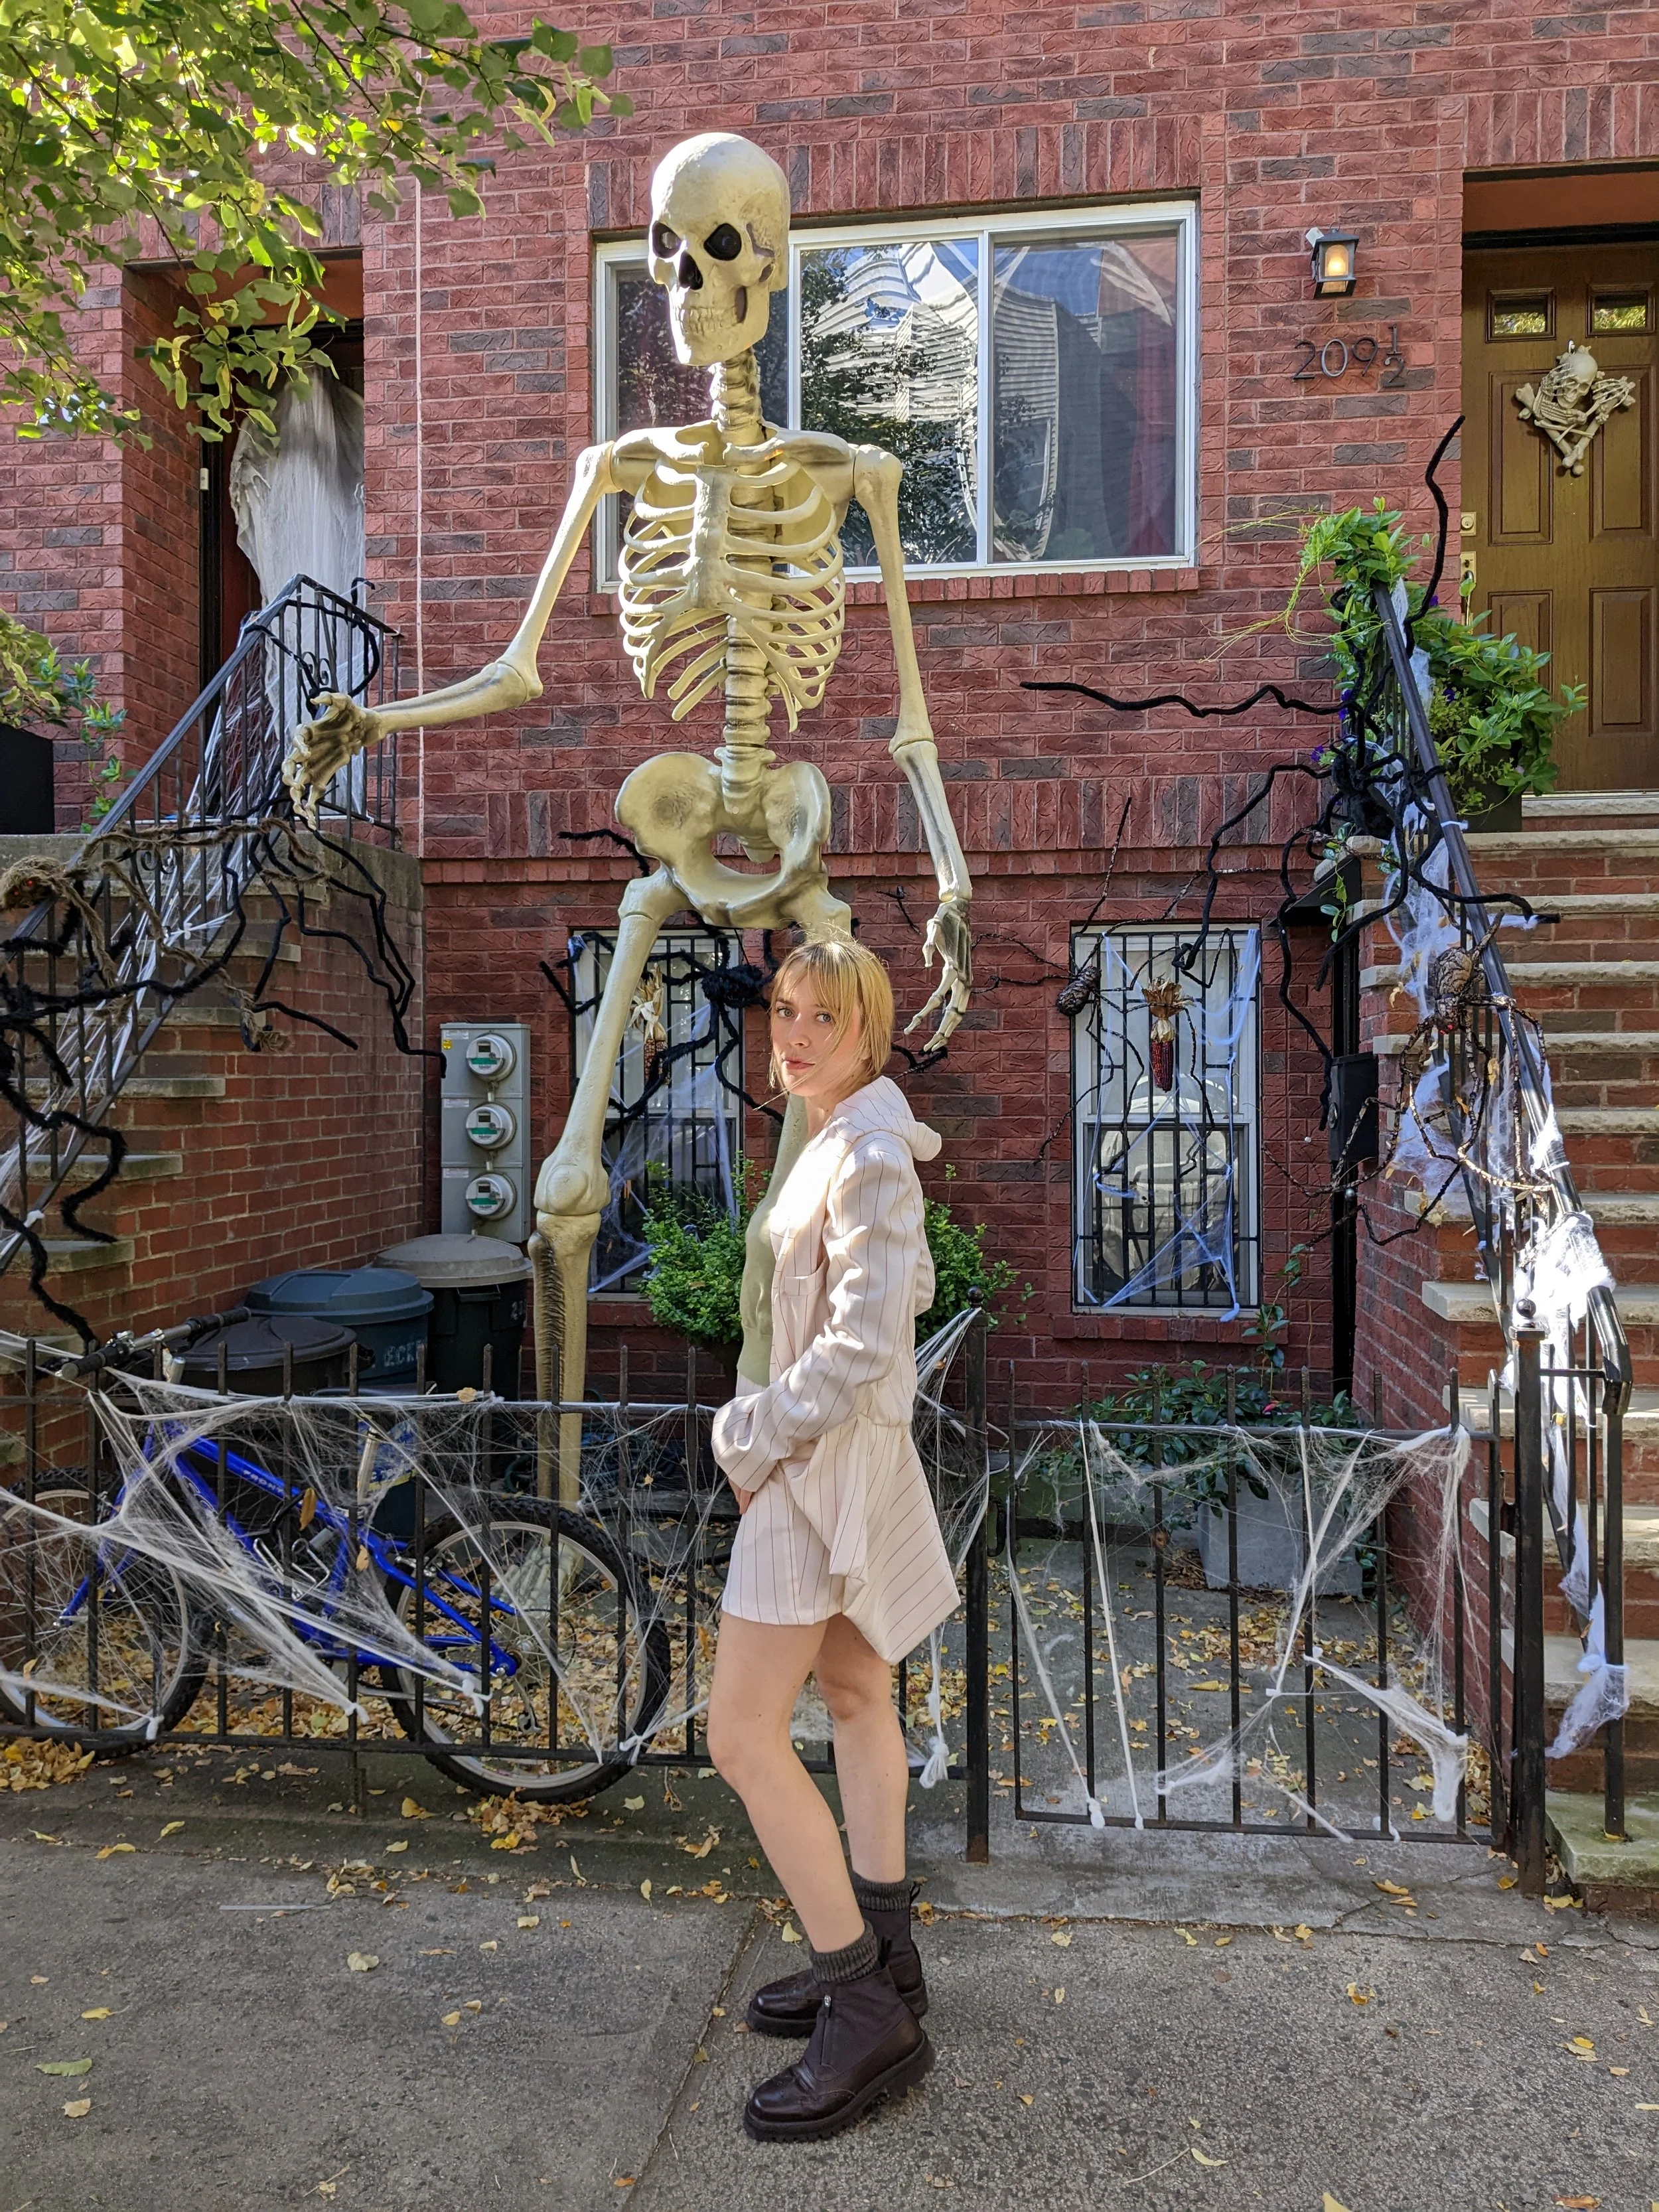
Me wearing it in front of a big skeleton lol. The sleeves are a little long. Happy Halloween! I have another project I’m very excited about, not Issey this time. OK, thank you for reading this blog or at least scrolling to the bottom. Love you. Bye!